Wednesday, May 29, 2013

Chicken Pot Pie


Everyone has their favorite comfort foods.  The first time I can remember tasting this was when I was four or five years old--it's one of my earliest memories!  And I remember it tasting divine.  It's probably been a favorite of mine ever since.  Serve up some chocolate chip cookies for dessert and I'm one happy chick!  It tastes like home and memories.

Now that I'm a mama, I've come to love this pie even more.  I can prep it early and have it ready whenever I need it--awesome!  Meat and veggies in pie form--perfect!  My kids are intrigued from the moment they see the pie in the middle of the dinner table, and stick around at least long enough to nibble on the flaky crust.  Can't go wrong.

Start with an unbaked double pie crust.  This recipe is super simple and perfect for chicken pot pie!

Next, preheat a large skillet with a couple tablespoons oil.  Add chicken and seasonings and cook thoroughly, stirring occasionally.


When the chicken is mostly cooked through, add chopped onions.  If the skillet is getting dry, give it a small drizzle of oil or a couple tablespoons butter.

*If you want to be traditional, at this stage you also mix in chopped carrot and celery.  But I choose the easy road.  See below.


Cook until onions start to become transparent and are starting to caramelize.


Add in mixed veggies.  The blanched/frozen variety.  Lots of them!


Once your veggies are heated through, add in a sprinkle of flour.


Stir it around so everything's coated.  Then pour in some chicken broth.  (milk or water work, too)


It'll seem a little watery, but after you cook it for a few minutes it thickens up nicely!


Remove from heat and pour into prepared bottom pie crust.


Top with another crust.


Seal the edges and cut vents for steam to escape.  Cover and refrigerate (or freeze) until ready to bake!  You can refrigerate for up to 2 days or freeze (cover it with aluminum foil to prevent freezer burn) up to 3 months.


Bake in preheated oven for 40 minutes, or until crust is cooked.  The center needs to look a little browned, too, to ensure the bottom crust has time to bake.  Your chicken is already cooked, so no danger there--doughy pie crust is just disappointing!  If the edges start to get too brown, cover them with foil while you continue to bake the pie.


Lightly toasted and gorgeous!  Let it sit at room temperature for 15-20 minutes to make it easier to serve.


Chicken Pot Pie

1 prepared double pie crust
2 T oil or butter (more if needed)
2 chicken breasts (or 1/2 to 1 lb), chopped
1/2 tsp paprika
1 tsp parsley
1/4 tsp sage
1/2 tsp salt
pinch pepper, or more to taste
1 small onion, chopped
2 cups frozen mixed vegetables
1/4 cup flour
1 1/2 cups (one 12 oz can) chicken broth, milk, or water

Prepare pie crust, leaving top off.  Preheat oil in large skillet.  Add chicken and seasonings and cook thoroughly, stirring occasionally.  Add onion (and extra oil, if needed) and cook until onion becomes transparent and begins to caramelize.  Stir in vegetables and heat through.  Sprinkle with flour and mix to coat.  Pour in chicken broth and simmer until sauce begins to thicken.  Pour contents of skillet into prepared bottom of pie crust.  Top with second pie crust.  Seal and cut slits to vent steam.  Cover and refrigerate or freeze, if desired.  Otherwise, bake in preheated 400 degree oven for 40 minutes, or until entire top crust begins to brown, adding foil around edges of crust if it becomes too dark.  Allow to cool 15 minutes before cutting and serving.

Monday, May 6, 2013

Belgian Waffles with Easy Berry Syrup and Sweetened Whipped Cream


This tops the charts as one of my all-time favorite breakfasts!  If I were visiting my Mama for Mother's Day this year, I would definitely whip up a batch for her.  

I love them because they're easy enough for a weekday morning, but delicious enough for a special occasion.  These waffles are crispy, with a rich flavor imparted from the yeast they use to rise.  Serve them with maple syrup, or my favorite--raspberries with sweetened whipped cream!

Start by combining warm milk and yeast in a LARGE mixing bowl.  Don't skimp on the bowl size--you'll regret it later!  Allow to sit for ten minutes until bubbly and frothy.  (Mine is pictured with water since we cook with powdered milk.)


In a separate glass measuring cup, combine eggs, vanilla and oil.  You can use melted butter if you're feeling extra fancy, but be careful not to cook the eggs in hot butter!

Traditionally, only egg yolks are used in this step and you beat the egg whites and fold them in later.  However, with several young children clamoring at my heels for breakfast, I've never taken the time to add that step, but I've never regretted omitting it.


Add the sugar and mix well.


Then add your dry ingredients.  If you're not using milk powder, you'll just be adding flour and salt in this step. If you are, combine the flour and milk powder before incorporating into the wet ingredients.


Cover and let rise for one hour.  So if you're starting in the morning, you'll have to plan ahead.  But this is one reason I love this recipe so much--make it the night before and refrigerate it all night!  Just remember to bring it out of the fridge while the waffle iron heats up so the batter's not too cold.


The batter will be bubbly and risen!


For a quick and easy berry syrup to top your waffles, place prepared berries in a small bowl and coat with a couple tablespoons of sugar.  Refrigerate overnight with the batter.  Frozen berries work great!


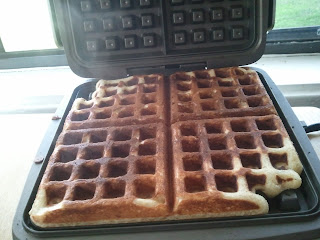
Preheat your waffle iron and pour recommended amount of batter according to the manufacturer.  Little tip:  put a little less batter than the manufacturer recommends, lest the batter oozes out the edges and makes a big mess.


Oooh, steamy!  


Remove from waffle iron when golden and crispy.  I like them toasted and crispy, so we go for a medium-dark look on our waffles.  If you like light and fluffy, though, time it a little less.  Our waffle iron takes 4-5 minutes for the dark and crispy version.


And for the topping--sweetened whipped cream!  Pour chilled cream into a medium mixing bowl.


Whip with an electric mixer...


adding sugar...


and vanilla, preferably with the mixer running (but not if you're photographing at the same time, unless you have three hands).


Mix, mix, mix until stiff peeks form.


Stiff peeks hold their shape when formed.  But only while the cream is cold, so serve immediately!


Belgian Waffles

3 cups warm milk
1 T active dry yeast (or one packet)
3 eggs
3/4 cup oil or melted butter
2 tsp vanilla
1/3 cup sugar
4 cups flour
1 tsp salt

Sprinkle yeast over milk in large mixing bowl.  Allow to sit for ten minutes, or until bubbly and frothy.  Combine eggs, oil/butter and vanilla in glass measuring cup and mix well.  Pour into yeast mixture.  Add sugar and mix well.  Add flour and salt and mix well.  Cover and let rise one hour, or overnight in the fridge.  If refrigerated, allow batter to warm for a few minutes while waffle iron preheats.  Pour just under recommended amount of batter onto preheated waffle iron. Cook until waffle is golden and crispy, about 4 minutes.  Serve warm, or cool on cooling racks, store in freezer bags for toasting on hurried mornings.

Easy Berry Syrup

2 cups berries, washed and cut into small pieces
2 T sugar (or more, if berries are tart)

Place berries in small bowl.  Sprinkle berries with sugar and refrigerate overnight.

Sweetened Whipped Cream

2 cups heavy whipping cream
2 T sugar
1 tsp vanilla

Chill whipping cream and bowl, if desired.  Pour cream into medium mixing bowl and whip with electric mixer on high speed, adding sugar and vanilla while mixer runs.  Continue to mix until stiff peeks form.  Serve immediately.