If you've been keeping track of the authors on this blog, you may have wondered if I'd ever post again. I'm not one to make excuses, so I won't. It's been a couple months, but I'd never leave you hanging forever!
Fudge is a great way to break out of a rut, don't you think? I usually save fudge for Christmastime, but this fudge has a history. It has a particular taste you can't accomplish elsewhere. This was the fudge I wanted, so it had to be done.
In my family, the history is simple, and probably similar to everyone else's. My memory is of my dad making this particular fudge, I think because it was his favorite and he had the most success with it. That doesn't mean Mom doesn't make a mean fudge. But we'll save that recipe for Christmas.
This is the fudge your great-grandma probably made 100 years ago, and I'm here to tell you it can still be done. Easier, if you know how to use a few kitchen gadgets. Harder, if you're an impatient modern cook. (No offense.)
I also love this because all of the ingredients can be found in your food storage (if you keep butter powder on hand, which I don't, but if you did you'd know how to use it). Otherwise, it's "just add water." When the world ends, you can still have your fudge for Christmas.
In Utah they celebrate Pioneer Day at this time of year, and this would be perfect to give to friends for just such an occasion. Old fashioned, yet delicious.
Start with combining sugar, salt, cocoa and milk (powder, in my case) in a medium-large saucepan. Mix the dries together before adding the liquid.
Then you can pour in the water (or milk, if you don't have dry milk powder).
Stir it up and put it over medium heat.
Bring it to a good rolling boil, stirring frequently so it doesn't scorch.
Rolling boil looks like this, with a semi-central spot where the liquid is getting sucked down to the bottom:
Now leave it alone. No more stirring. Just peek at it every now and then and make sure you're not boiling over. And for goodness sake, don't let it burn.
Did you notice how close to the edge of the pan I was? Don't do that. Use a bigger pan than you think you need.
Next topic: candy thermometers. They're awesome if you know how to use them right. The bulb should not touch the bottom of the pan, but does need to be submerged in the candy if you're going to get a reading. I managed to boil down below the bulb, so my thermometer stayed at 220 degrees F for a really long time. What you're looking for is 234 degrees F, or soft ball stage. At soft ball stage, when you drop a few drops of hot candy into a glass of cold water, they fall to the bottom in little balls which are still pliable if you dump the water out. I'm no good at soft ball, though. And my thermometer was a problem. So I called my mama, and this is what she said:
"Is it nice and glossy?"
"Yes, it's been glossy for awhile now. It's also very thick and it's reduced quite a bit."
"If it's thickening in the pan and it's good and glossy, you know it's done."
Thanks, Mama. By the way, this took about 45 minutes to an hour.
Remove from the heat, add butter and vanilla and DO NOT STIR. Walk away for another 30-45 minutes, until the thermometer reads 110 degrees F or it gets to a little hotter than lukewarm.
See? The butter can melt all by itself without you watching.
Now stir it in. Remember, you're starting out glossy.
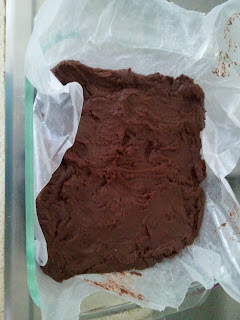
The finished product will have a pretty matte finish, but don't beat it to death! Once it's good and thick and not so shiny, just stop. Bad lighting photo:
Better lighting. Still looks a little shiny, right? Like frosting.
Okay now. I will confess I am telling you "do what I say and not what I do" because when I plopped the fudge into my wax-paper lined dish, it was nearly solidified. I repeat: don't over-mix.
Spread it out into the pan and let it cool to room temperature, then refrigerate before slicing and serving.
Old-Fashioned Cocoa Fudge
3 cups sugar
2/3 cocoa
pinch salt
1/4 cup plus 2 T dry milk powder
1 1/2 cups water
1/4 cup butter
1 tsp vanilla
(optional: use 1 1/2 cups milk instead of milk powder and water)
Combine sugar, cocoa, salt, milk powder and water in medium-large saucepan. Bring to rolling boil over medium heat, stirring frequently. Allow to boil until candy reaches 234 degrees F, or soft ball stage. Mixture should be glossy and thick, having reduced by about half. This will take at least 30 minutes. Remove from heat and add butter and vanilla. Do not stir. Let sit another 30 minutes, or until temperature reaches 110 degrees F, just warm to the touch. Stir in melted butter and vanilla. Mixture will be glossy. Beat with wooden spoon until it looses most of its shine and becomes slightly difficult to stir. Pour into 8x8 dish, either buttered or lined with wax paper. Allow to cool at room temperature. Refrigerate before slicing and serving.